Showing posts with label crafts. Show all posts

Thursday, August 15, 2013

The Children's Department


I love my library.  Love love love my library.  If you follow me on Facebook, Twitter or Instagram then you already know that my family spends large amounts of time at this library.   
My history with the Covington branch of the Kenton County PublicLibrary began decades ago…when I was a little girl I spent every single Saturday with my grandfather.  He took me to fancy restaurants, taught me how to drive in the fields at our family farm, and we spent many an afternoon at the Covington Library.    
He would hole up in the geneology department going through miles and miles of microfilm, looking for clues to our family’s past.  I should say, all that work paid off when he and my grandmother found her relatives in Ireland.  I snapped this picture (to the right) of the microfilm machines shortly before this section of the library was slated for remodeling.  I wanted to remember that little section forever.  I can almost see him sitting there. 

While he worked on the microfilm machines (surely there’s a more technical name for these!) I would scamper upstairs to hang out in the Children’s Department (just like Ella is scampering up that wonderful old staircase to the left).  I spent so many happy hours in that library…looking for the perfect books, and going to storytime. As much fun as I had though, I don’t remember the Children’s Department being as rocking cool as it is today.  In fact, I remember being downright afraid of one of the librarians back in the day.  That's not the case anymore...everyone is kid-friendly at the Covington Library's Children's Department these days.     

Here are some things that make the Children’s Department of the Covington Library Extraordinary:
  • They quite obviously hand-pick the most patient, kind, knowledgeable and creative staff that they can find to run this department.  As evidenced by so many things, but most recently when I was walking around looking for books for the kids and a librarian overheard me mention that Sam liked otters and she jumped right up and started looking for books for him.  I didn’t ask her to…she was just that helpful.
  • They have the COOLEST programming…and not just storytimes, they do crafts, cooking programs, and the coolest of all in my kids’ opinion, the World Explorers program.  Ms. Liz teaches the kids about artwork from another country while they replicate that art.  The first week they went they made canopic jars, which led to a discussion about Egyptian burial practices, and how they pulled the brains from the bodies.  Ewwww…gross!  My boys loved that.  And before you think that storytimes are for little kids, think again…the library has programs for all ages!  Henry is too young for World Explorers, so he loves going to Preschool Storytime.  Ms. Amy always has something fun up her sleeve...not just books to read, but engaging activities to go along with the week's theme, the best theme of the summer being "Ice Cream" of course!
  •   When my daughter went to pick out her birthday treat at the library the three ladies on duty that night sang happy birthday to her, which I know she loved (that’s right, they send you a birthday card which you can bring in and exchange for a small treat).
  • Have I mentioned patience?  I mean come on, my four kids hang out there on a regular basis and everyone who works there is so patient, even when Henry breaks the “walking feet” rule.
  •  They not only have great programs for the kids, but it’s just a great place for kids to
    hang out in general (with parental supervision of course).  This summer I’ve taken to hanging out at the library to get my blogging work done, and the kids entertain themselves.  There are books to read (of course!), games to play, computers to use, crayons and paper, toys and more.  While I’ve been sitting here  typing this the older three kids are in an Art Program and Henry has entertained himself with toy trucks and comic books.  It’s a win-win for everyone!
  • And I should say, it's not just the Children's Library that's awesome...Kenton County Public Library is a great organization all around...full of awesome people who love to chat about books, find the perfect book for you when you aren't sure what to read next, or hunt until they find that obscure book that you just have to have. 
 Here are some more pictures from our visits to the library…


Do you love your local library?  Why?

Tuesday, July 23, 2013

Chicka Chicka Boom Boom Sticker Craft

Are you looking for a simple craft for the munchkins to work on to strengthen letter recognition and practice fine motor skills?  How about making a Chicka Chicka Boom Boom Tree for them to decorate with letters?  Before you do this craft though, you simply must read the book together with your child (Chicka Chicka Boom Boom by Bill Martin Jr. and John Archambault, illustrated by Lois Ehlert).  It's a fun book to help kids start to recognize their letters.  After you've read the book you just need some colored paper and ABC stickers to make a educationally fun craft for young ones!  This project is best for kids aged 2-5, and not only will it help with letter recognition, but it's great for fine motor skills too, because removing the stickers from the paper is not easy...they really have to focus and use those little fingers with finesse!  This is a great at-home project, or a project for an early childhood classroom.  Another great Chicka Chicka Boom Boom activity is the Chicka Chicka Boom Boom Magnet Letter Activity.

How to make Chicka Chicka Boom Boom Trees ::
 
First, gather your materials: black or white paper, brown paper, scissors, glue stick and ABC stickers (I always use my leftover scrapbooking stickers to give them some variety)


Using the Chicka Chicka Boom Boom book as a guide cut out brown and green paper to make a coconut tree (it's very easy...and the toddlers didn't care about imperfections in my tree-designing skills).  Glue the trees to the black (or white) background paper.

Then give the children stickers and let them go!  While they worked I pointed out letters, demonstrated the sounds the letters made, and helped peel stickers as needed.  The boys (age 3) worked on this almost independently.  Afterwards we read the book again (and again...and again).

Saturday, March 16, 2013

St. Patrick's Day Fun....

I wanted to share some fun St. Patrick's day links with you to help you get in the mood for celebrating this weekend!  And then I have some links for recipes that aren't necessarily St. Patrick's day related, but they have a bit of green or mint involved.

A wee bit of St. Patrick's Day fun for everyone ::

Pictures of my kids on Saint Patrick's Day (This one made me want to cry)
How to make your own Thin Mint Cookies

GREEN Mac n Cheese...what?!?!  It's healthy..check it out ;)
Mint Chocolate Chip Pancakes (I say "ewwww" but I'm sure the kids will love them!) 
Researching your Irish Heritage at the Kenton County Public Library
A Leprechaun Gift (easy to make - for soda pop bottles - too cute!!) 
Pictures from my trip to Ireland in 2006 with my mama, my sister and my baby girl
Making your family a St. Patrick's Day Green Dinner (cute and tasty!) 
The Crafty Crow has a great roundup of St. Patrick's Day Crafts
Rainbow Fruit Pizza...yummy AND healthy! 

And if you live in the NKY or Cincy area, here's a list of fun events for the whole family on Family Friendly Cincinnati.  And here's another list of beer-drinking type parties around town from Hoperatives.

What kind of trouble fun are you getting into this St. Patrick's day? 


Sunday, March 3, 2013

Ella's Monster Doll Tutorial

For Christmas Ella wanted to make a Monster doll for her cousin, so she took the initiative to figure out to make the doll herself and with very little help from Mama she created an awesome felt doll!  While working on the doll she decided that she wanted to blog about the process, so I snapped pictures as she worked, and today she sat down and wrote about the experience.  I have to say, I was quite proud of my girl when she did this.  She's so creative, and so independent.  I've always let crafting supplies be available for my children from an early age, to encourage their imagination and cultivate their creativity.  I love watching them take an idea and make it happen.  If you have a young one who is into crafts (or monsters) then check out Ella's Monster Doll Tutorial on her blog.  

Thursday, February 21, 2013

Jenny's Wedding Shower :: Pink & Black Roses & More...

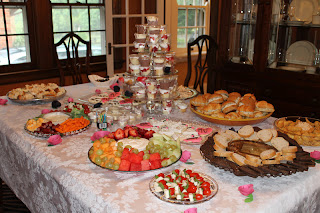
My sister-in-law Jessica and I planned a shower for our future sister-in-law Jenny last summer (don't ask why I'm just now posting this so many months later....).  We wanted our daughters (the flower girls) to be a part of the shower, so we had a girls night and made decorations for the party.  The wedding colors were pink & black, so we tried to come up with decorations to match those colors.  We didn't really have a theme for the party, we just wanted it to be lovely and charming and laid back. 

The girls (and Jessica) made these adorable paper roses in pink and black, which are the wedding colors.  
We used the roses to decorate the buffet table and other tables around the house.  They were so cute, and everyone was asking about them.  We found the pattern at Santa Barbara Wedding Blog ::


We had quite a spread for the shower!  (Notice all the sweet paper roses all over the table) ::

I made this banner using my Creative Memories cutting system ::


I also made this banner by free-handing the letters J + M (Jenny & Matthew)...and just look at those cute little flower girls!

Here's a few of the delicious items we served that day :: 
On the right are some outstanding "Pudding Shots" made by Jess, then we had cookies made by Vivian Sweets, and a very easy & very tasty appetizer I made with Tomatoes, Mozzarella and Basil.

And here's a picture of Matthew & Jenny and the girls on the big wedding day last September ::


Friday, February 8, 2013

Easy Homemade Valentines

Tis the season for hearts and cupid and such.  Each year our family has a valentine making day where we make valentines for each other and last year the kids and I made super-cool valentines together for them to take to school (read about them here).  But this year because of other projects going on I didn't have the time to work with them as much to create the valentines for all four of their classes.  I needed an valentine project that they could work on independently.  But I refused to go back to store-bought valentines.  The kids were so excited about making the valentines in years past, so I wanted them to be able to make their own valentines this year.  Rummaging around the basement I stumbled upon a bunch of paper hearts that my mother had given me to use with the kids.  That, combined with some valentine stickers I found on sale at Joann Fabrics made for the perfect valentine-making party!  The valentines we put together were so simple, and not too expensive.  The kids worked independently to create valentines for their class, and then this weekend we can have our family valentine making party and get a little more creative!

Here's what you need:
Paper to make the valentines (I happened to have some pre-cut hearts, but you could have your child cut their own hearts, or even use smaller paper cut in any shape.  Then I put together a box of random stickers, papers, tape, glue, scissors and markers and set them loose.
I started Henry's for him and then he decorated them.  
Ella loved the little felt stickers that I found at Joann Fabrics...they were super cute!
 I basically just provided the materials and then let the kids get to work.  They did not need much help from me, and really enjoyed themselves.  And our valentines are ready to go!  Now...to make the valentine boxes....


Friday, January 25, 2013

Indoor Fun on a Snow Day {or a Rainy Day}

Snow days are my favorite!  I love having the kids home for the day, spending the majority of the day in our pajamas, and having fun!  We love playing outside in the snow, but when the temperatures are so cold we tend to come inside to warm up and have fun.  I've come up with a list of fun things you can do with the kids on a Snow day (or a rainy day...or ANY day!).  


  • Read books!  Do your children take AR tests at school?  A snow day is a good time to squeeze in a bit of extra reading as a family.  
  • Make your own playdough!  This can provide HOURS of fun!  Here are my instructions on how to make playdough at this link.
  • Play dress-up, even if it means raiding Mommy & Daddy's closet for things to wear.
  • Make a Hot Chocolate bar
  • Do some baking.  There's nothing better than a fresh-baked muffin or cookie to go with your hot chocolate on a snowy or rainy day!  Here's a few of my favorite recipes for baking.
  • Make a cool snowperson craft
  • Work on a puzzle
  • Make Alphabet books with the kids, this is such a fun project.
  • Have a movie party...pick out a family favorite, pop some corn and watch a movie in your pj's.  Or make it an even bigger event like we did for our Harry Potter party last year.
  • Play games!  So far today we've had Cootie Bugs, Battleship and Monopoly Jr. going on.
  • Do any sort of craft (I keep a box of winter crafts in the basement for snowy days - comprised of items I purchased on Oriental Trading or picked up at the Dollar Tree)
 How do you spend your snow days?

Tuesday, January 15, 2013

Ice Cream Sundae Baby Shower Gift

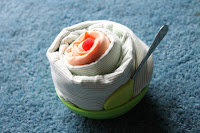
 My cousin and his wife are expecting a baby and their baby shower was last weekend.  Ella and I thought that we should make a very special present for their babe.  So of course we turned to Pinterest for ideas, and YouTube for videos on how to make desserts out of baby items.  I couldn't find step-by-step directions for small sundaes like this, but instead found all kind of other desserts.  So I went ahead and put together a tutorial for the blog.  These sweets were a huge hit at the party, everyone thought they were super-cute.  And it was fun to make them.  It took a little trial and error to get the blankets and onesies to look like ice cream, but eventually Ella and I figured it out!

Tutorial :: Ice Cream Sundae 
made with Baby Blanket & Onesie.  
** a perfect baby shower gift **

 What you need (for a set of four sundaes) :: 4 Receiving blankets, 4 onesies, 4 plastic bowls, 4 baby spoons, and four red pom poms for the cherry.

Step One :: Fold the blanket into a 2 1/2 - 3 inch strip, fold the onesie into a 2 inch strip.

Step Two :: Roll the undershirt

Step Three :: Roll the blanket around the onesie

 This is what mine looked like after rolling the onesie in the blanket.

Step Four :: Stuff the whole thing into a  bowl, tucking the end of the blanket inside the bowl

Step Five :: Add a "cherry" on top and a spoon with which to eat it!

My cousin loved it so much he wanted to eat it!


Tuesday, October 23, 2012

Paper Pumpkin Craft

Are you looking for a simple Halloween craft for the wee ones to do?  I put together a very easy paper pumpkin craft today, and it kept the kids occupied and entertained while I finished up some work this afternoon.  I love projects that can be worked on independently, it makes the children so proud to work on projects on their own.  Plus this project yeilds cute decorations for the Halloween holiday!

What you need:  Orange, Black & Green paper, scissors (or paper punches) and glue sticks
I cut the orange paper into pumpkin shapes and made a variety of black shapes to be used for the faces and green squares for the stems.  I was preparing this for young ones (Henry is 2), but you could adapt this for older kids by letting them cut out the black shapes themself.  I think you could get some really interesting faces if the older kids cut out their own shapes. 

Next step:  Glue black pieces onto the pumpkin "face" and add the green stem.


The final products:

Tuesday, September 18, 2012

Ella's first sewing class

Ella took her first sewing lesson this past weekend at Sewn Studio in Oakley.  I love love love this store (see this post I wrote about my first visit to the store).  Ella loved this sewing class, and came home with a very cool new pillowcase.  She is already wanting to do more sewing projects now that she's been introduced to a sewing machine.  I should clarify, this was her first class with a sewing machine...she took a hand sewing class earlier this year and loved it.  The class was reasonably priced, and the teachers were patient & knowledgeable.  Ella cannot wait to sign up for another sewing class.  Check out their website, they have classes for children and adults!  Maybe someday I'll find the time to take a class myself. 

Sunday, May 20, 2012

My First Crayola Art Supplies :: Review & Giveaway :: CLOSED

This Giveaway is now closed!
Congrats to Jamie who gave us a great craft idea...Mirror out of spoons!
http://www.addicted2decorating.com/how-to-make-a-decorative-chrysanthemum-mirror.html

Jamie, please email me at Katie(at)Cards-by-Katie(dot)com to claim your prize!
You all must know by now how much I love encouraging my children to be creative and express themselves through art.  The kids love to take art classes, we make visits to our local art museums regularly (the Contemporary Arts Center and the Cincinnati Art Museum), and the kids have more art supplies at their disposal than some preschool classrooms have.  We have a cool cabinet in our dining room full of stuff they can grab any time to create with.  I think that encouraging them to explore and create artisitically will encourage creative thinking in all aspects of life.  I want them to grow up thinking outside the box, and coming up with creative ways to solve problems. 
So you can imagine how excited I was when I was approached by BlogSpark about doing a review and giveaway of products from the My First Crayola line.  And you can probably also imagine the glee that ensued with all of the munchkins when a package arrived in the mail containing all of the cool items you see below:
Wow!  My kids couldn't wait to take all of these products for a test drive!  And we were not disappointed!  Here's a few things that I love about this collection as a whole:
- I love that they are washable
-I love that babes as young as 12 months can use some of these products to explore artwork in an age-appropriate way (the products are marked 12 months + or 24 months +)
- I love that my 2 1/2  year old can use the materials independently to entertain himself when I need a few minutes of peace to do something like cook dinner
- I love how fun they are!  
-I love that even though these products were made with the wee ones in mind, my "bigger" kids got a kick out of the products too!

Henry had a blast with the markers!
Toddler art fun! 
Robin was amazed by the magic paper that turned colors when you used the special marker
The dry erase activity mat is just perfect for Henry to use even when Mama is not sitting right there with him!  He's been using this at dinner time to occupy himself so mama can cook in peace.
And this...this is super cool, it's a musical Rub-Art Station.  It plays music while you rub crayons over paper on top of farm image plates.  Henry LOVES this one the best!  He just giggles and giggles when he uses it.


Here's a video commercial with more details about My First Crayola supplies ::


My First Crayola Giveaway  ::
I will choose one winner using Random.org on Tuesday, May 29th at 2pm, and announce the winner here on my blog and on the little things facebook page.  The winner will have 48 hours to respond via email or another name will be drawn.  Here are some of the items you might find in your prize package: My First CrayolaTM Washable Crayons, My First CrayolaTM Washable Markers, My First CrayolaTM Washable Stampers, My First CrayolaTM Washable Dry-Erase Activity Mat, One specially marked box of original Cheerios® cereal

How to Enter ::
1.  Leave a comment below telling me why you would like to win this.
2.  Leave a comment below linking to a super-cool arts & crafts idea you have found on the internet.
3.  "Follow" me on Pinterest and leave a comment below telling me you do so.
4.  "Like" the Crayola facebook page and the little things blog facebook page and leave a comment below telling me you did so.  If you already like the little things facebook page, please considering inviting your friends to like it ;)
5.  Give a shout out about this giveaway...either on facebook (tag the little things blog), or twitter (include @LittleThingsMom and @Crayola and include the hashtag #MyBlogSpark).  Or you can always spread the word using email.  Then leave a comment telling me how you spread the word.


And here's a special offer ::
Crayola and Cheerios® cereal are offering up to $5.00 in coupon savings on My First CrayolaTM products, so you can enjoy a little colorful fun at the breakfast table!  Look for My First CrayolaTM on original Cheerios cereal boxes. 

Disclosure ::
The information, products, coupon, video and additional My First CrayolaTM gift pack was provided by Crayola® and Cheerios through MyBlogSpark.  Thank you to all of them!

Friday, May 4, 2012

Craft ~ Mother's Day Card

Are you looking for a cute and easy card to make with the kids for Mother's Day?  I came up with a simple card, and the best thing is you can use all of those extra school pictures you ordered this year that are still sitting in the envelope!  These cards are perfect for Mamas, Grandmas, Nanas, or even teachers for Teacher Appreciation Week!  So many uses!  And it can be done with kids of all ages, it's just that if you do it with wee ones you will have to help quite a bit with cutting.  Let me know what you think!
Materials Needed:
Colored Paper (whatever colors you'd like, we used orange, yellow, green & blue)
Scissors
Glue
Colored Pencils, Markers or Crayons
a Circle Stencil (you can trace with a cup if you don't have a stencil)
Pictures of your child

Like I said, it's a great way to get rid of all those extra pictures you get suckered into buying each year.

First you draw a circle around your child's face.  Then have them cut it out, or if they need help then you can cut it out.  This project is great for practicing fine motor skills!  Cut another circle out of paper the exact same size as the circle around your child's face

Then I free-hand drew some petals, leaves and circles for the kid to use.  Although the older kids made their own leaves & petals which was very cute.  If you look online you might be able to find petal or even flower templates you can print and cut out.

Then the kids used the glue sticks to adhere a stem that they cut out of green paper and the circle to the paper.

Add some petals

And some leaves

And voila!  You have a Mother's Day Card!

This is the message we put on the inside:
Dear Nana,
Thank you for helping me bloom & grow! 

Sam of course had to make his card unique!  Which I love!